Our new website
We’re launching our own website. To keep reading our blogs go to http://www.papermoviebooks.com
Writing for kids
Julia Donaldson is an amazing kids writer. She is the author of things like Room on the broom.
Her stories are always original and cute. They rhyme and the pictures are colourful and fun to look at. I have yet to meet a child that doesn’t get tickled by her work.
If you look at why she is different for most of the other children’s writers then you see a couple of clear messages.
Don’t talk down to children
Kids are not idiots. They probably understand more that you give them credit for. They are more imaginative and enjoy playing more than adults, this means that you can play with the words you use and make interesting characters for them.
Short but tickle the imagination
Donaldson’s books tend to be short enough for a parent to read in one sitting. This is great because kids get bored with long winded stories. But in that space she really let’s kids use their imaginations as she describes all sorts of fun, original tales.
No morals
Lesson books about a child who doesn’t want to share are in abundance. Who needs that? Good parents have taught their kids about sharing without the use of these stupid books. Keep to entertainment.
Original
I have mentioned this a couple of times in the other sections but this deserves a section of its own.
The more original and fun you can be the more kids will enjoy your work.
The next time you are in a book store look out for a copy of something by Julia Donaldson and you will see what I mean.
How to measure height when you draw characters
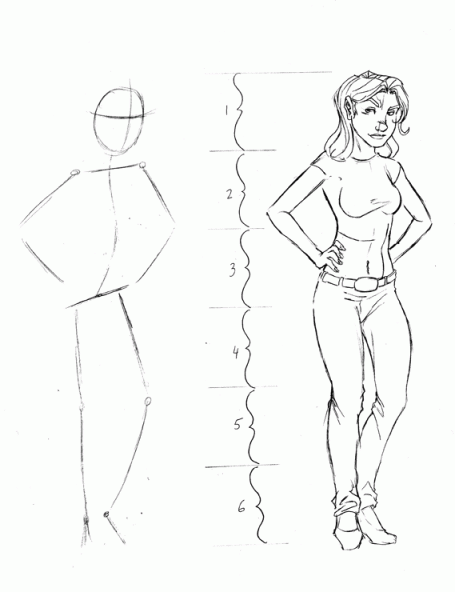
This week I just want to brush over how to get your proportions correct just by knowing how tall your character should be.
In my case my average character is 6 heads high. Male or female. Males can be 7 if you like and females can be around 5 if you prefer. 6 is just average. Take a look at the drawing for this week.
I have sketched a character, paying attention to where all the important joints should be. All together it measure 6 heads in total. Usually the crotch area is 2 and a half heads down from the chin. And the last 2 and a half heads are the legs.
My character is almost perfectly split. 3 head bottom and 3 heads top. Experiment with height and let me know how it turns out.

How to do shading
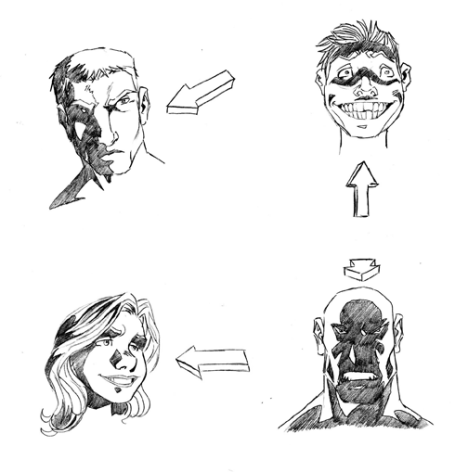
This week we are going to look at knowing where your shadow areas are going to be.
This will all depends on where your light source is coming from.
I usually do this in colour (we will cover this in a future blog), but a lot of artists do the shadows in the drawing phase. So if you’re that way inclined have a look at the drawing for this week.
From left to right. The first guy is a typical male character and the light source is coming in from the right. Therefore all the shading would be on the opposite side. Notice what happens with eyes, nose and cheeks. Make sure that your shading takes into account the contours of the face.
Secondly, the smiling character. The light in this case is coming from underneath his face. This is probably the hardest to do because all the shading would be in areas which usually have no shading. So, this can be rather confusing, just plan correctly.
The 3rd drawing of the woman. The light source is in the same place as the 1st drawing although her head is slightly turned towards it. Look at the significant difference it makes to how you shade her. Now the shading doesn’t cover half the face anymore.
And lastly in the fourth drawing the light is coming from behind the character. So all his forward features would be in shadow.
When you choose a light source you need to consider what impact the shading will have on the character. Is this going to work with the rest of the emotion that you are trying to convey?
Tip: When you are trying to decide what to shade and what not to shade, look at the parts of the face that protrude. Chances are that those are the parts that aren’t shaded, they would create shadow behind them.
Practice makes perfect with this one. Experiment and have fun!

How to fix a story plot
There are a couple of reasons why a story plot is not feeling right or is boring. Examine the work and see if you can find the week points using this guide.
Too little action
A story becomes tedious if there is a lot of inner feelings and not a lot of action. This doesn’t mean that you need to have ninja’s jumping through the ceiling, it just means have your character do something interesting. This has to tie in with the book and the character.
Take Kung Fu Panda – it was a cute little story of a rather large out of shape guy that ended up being a super Kung Fu fighter. In it his inner changes were matched by a lovely sequence showing him learning and growing.
Too much action
An action film with no real plot is an excuse of car chases and fight sequences. Make sure that the action is relevant to what you are saying.
Keep asking yourself, what is this telling me about the character and is it clear enough that the dumbest member of the audience will get it?
A weak main character or main plot
99.99 percent of story problems come from a weak main character or a problem with the plot. You have to make sure that you have an interesting character that people want to get to know. You also need to make sure that the reason for the character doing or reacting to something is strong enough to drive the plot forward.
Weak character or weak plot = terrible story
Information which is not relevant
Too often a writer will have a weak concept or a concept that will get him or her 150 pages into the book, but it is difficult to end or it is too short. This means that they will go back into the book and kill good writing with bum fluff (a term I use for the really irrelevant, thoughts, feelings and descriptions which leave you thinking, who cares?)
I wish the publishing houses would learn to cut these books down. I would rather read a good 100 page book than a fluffy 300 page book. Oh, but a great book, be it 100 or 300 page is well worth it.
Repeating a point
Too often a writer will have a weak concept or a concept that will get him or her 150 pages into a book…
Repeating a point is annoying. Do I look so dumb that you had to tell me this three times? Dude, I got it the first time, move on or do you have nothing more to say?
At the end of the day, if you describe the character well and keep the pace of the books good. Have an interesting plat and character then you will have a readership.
We would love to see some of your work. Please post some of your writing, plots or ideas and we would be glad to comment on them.
How to draw hands
Hi guys
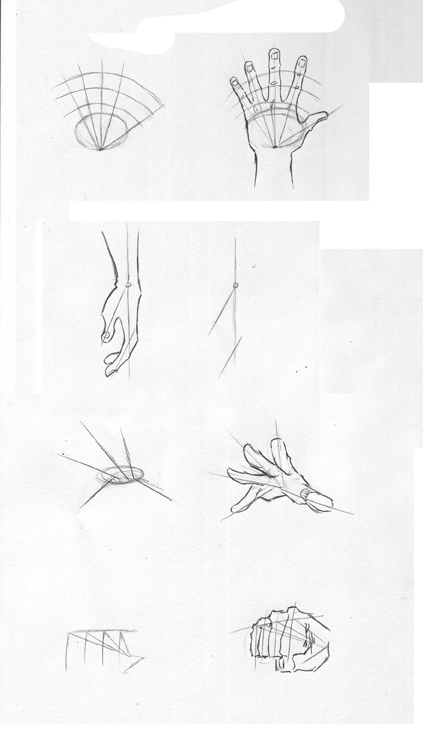
This week we’ll be looking at how to draw basic hands by developing a system to work with.
First we start by roughly sketching a circle see drawing 1.
This is the palm of the hand. From the wrist end of the palm use a starting point and line out where you want the fingers to go. (Bear in mind your fingers can only spread so far).
Then add a few cross lines above the palm circle. Where these intersect will become the points where your knuckles/joints are. Now that it is measured out you fill in the detail of your hand. Use your own hand for reference if you have to. After drawing a few you’ll get so used to it then it will become second nature.
To recap, see the next 3.
Sketch it out, pop in the joint points and fill out your hand. Remember to use your own hand as reference if you have to. And keep practicing!

drawing hands
How to publish your own book
I am always getting publishing requests from people or letters begging for advice on how to self publish their work. So, I have created a self publishing guide.
You can self publish in one of the following ways:
Start a blog – this may not seem like self publishing but it is an excellent way to get know and build a following. You might want to look at this as an option, at least for your first work. The trick to blogging is to do it regularly. Make sure you post a new blog entry at least once a week. You might not make any money off of book sales, but you can put something like google adwords on your site once you become popular enough and can earn some money that way.
Do it with amazon.com – amazon is promoting digital books like mad since they released Kindle. And with version two of Kindle out now we can’t see it going anywhere. Problems with amazon.com’s digital books – as far as we can tell Kindle only has a black and white screen. This means that it is not conducive to anything will colour illustrations or designs. Also, you must have a paypal account in order to get paid. This is rather sucky for anyone in South Africa as paypal doesn’t work here.
Try a print-on-demand company – these guys specialize in printing really small quantities of your book so that you are not sitting with a heavy printing bill. Problems with print-on-demand – it’s up to you to market the book and spread the word about it. This is not as easy as it sounds and can often be expensive. Also print on demand tends to be a lot more expensive per copy than bulk printing which means you will have to sell it for a higher price and you will have to take a smaller cut.
Print it yourself – If you have loads of cash, you could print a bunch of books and distribute it to stores yourself. This leads to a whole lot of issues. Costs and taxes – in South Africa printing is rather expensive. Apart from that anything that you print and hold stock of is considered an asset by the tax man. So you get taxed on it, even if you don’t sell it right away.
Storage – You have to find somewhere to put all the books that you publish. This usually leads to you hiring a distribution and storage company.
Distribution – in SA you have to sell your book to each Exclusive books store as if they were not related to each other at all. This is a lot of time and effort and because they are so busy they don’t want to see independents, so it is best to get a distributor. The sad fact of the matter is that once you have created it and managed to get it into the stores you now have the shops taking 50% of the money for the book and the distributors taking 20%, leaving you with 30% to cover all the costs of production.
You could try the CNA, but they will probably try and strong arm you into giving them a huge discount and then still taking 50% of the cover price. Frequently asked questions Where do I get a barcode? You call the national library (at least in SA) and ask them to fax you an isbn number (please note that only printed book require one of these) They will send you the number along with a form to fill in. Once you have the isbn you go to google and search for free barcode generators. You will find several different ones. Now you type in your isbn number and it generates a barcode for you which you then save as an image onto your computer. When you lay it out you add the barcode image in on the back cover of the book.
Make sure it is nice an large, so that scanners can pick it up and that there is white space behind and around it. How do I make it look nice? You need to find someone who understands layout and design. Preferably someone with their own desktop publishing software (something like indesign not photoshop).
Chose a paper size (there are standard sizes, phone your printer and ask them what it is. Bear in mind that oversees printers use different sizes to here.) Get this person to do the layout for you. Negotiate a fixed price and make sure that it includes a set of error fixes. This will give you some room to wiggle if you spot problems that need correcting.
Tip: When laying out your work look out for orphans or widows. This is what we call stray words that end up alone on a line. They need to either move to the previous line or a word from above needs to come down.
How to draw a mouth
Like hands, a lot of people battle with drawing mouths. Choosing to use either the line mouth or teeth clenched mouth, all the time.
Too often we see characters speaking to each other with gritted teeth, what’s that about? Like before, it’s all about having fun and experimenting.
I use to sit for hours on end trying to get the perfect nose and the perfect eyes and in the end they were never perfect. Practice by jotting down a sketch as quickly as you can with the aim of just having fun. It’s a lot less frustrating that way.
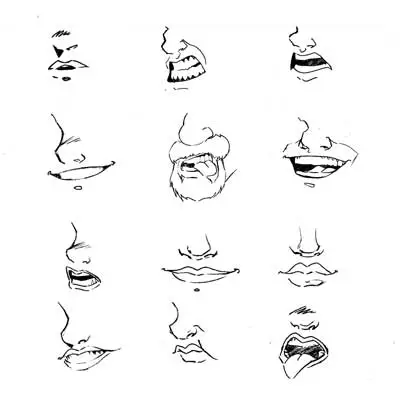
So, with regards to the pic this week, the top two rows are men’s mouths and the bottom two rows are those of women. The big difference between the two is the fullness of the lips. I did this on the upper lip of the first guy mouth to add a good looking feminine-ish look to him.
Start the mouth by deciding what expression you want to capture then draw a basic outline of the shape, open for shocked or shouting, smiling for happy.
Now add the smaller details, the hair, the lips the teeth and tongue. Perhaps there is a mole on the top lip or a scar across the lip. I varied the mouths with things like hairy faces, fuller lips, funny expressions. Have a close look at each and give it a shot at doing some of your own.

how to draw a mouth
How to write a book – the basics
The first steps towards writing your own book.


